Ditch After Effects? Premiere Pro’s AI Masking Is a Game-Changer
Ever had footage where you need to blur a face for privacy or color-grade just one person in the frame? The old routine meant bouncing between Premiere Pro and After Effects—turning simple tasks into tedious, time-consuming processes. But Adobe’s new AI-powered object masking in Premiere Pro flips that script entirely.
This feature automatically spots people and objects in your clips, whips up precise masks with a single click, and tracks them through every frame. I tested it out in the beta, and the workflow speedup is night and day. What used to take 30 minutes of manual keyframing now gets done in under two.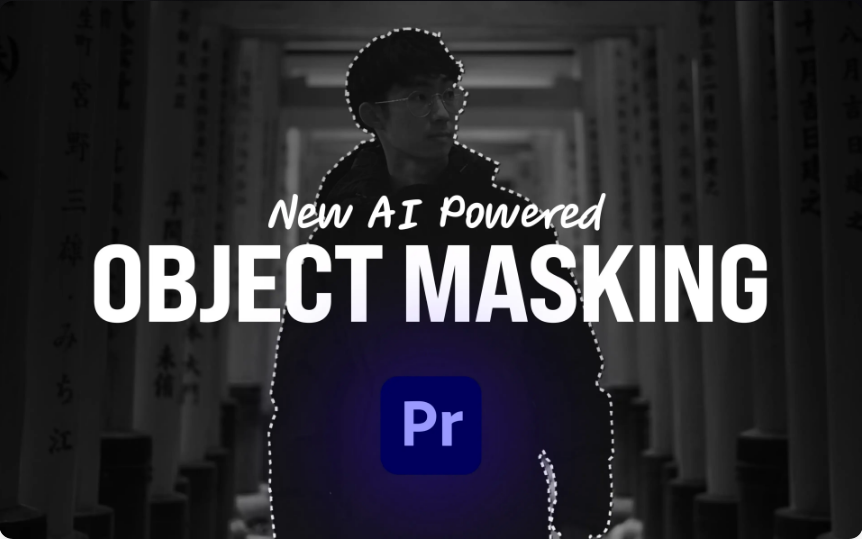
First: Enable the Feature (Beta Only)
To use these tools, you’ll need Premiere Pro Beta version 25.6 build 48 or newer. Here’s how to turn it on:
1.When you launch the beta, a pop-up might ask if you want to enable new masking. Click “Enable new masking”—you’re ready to go.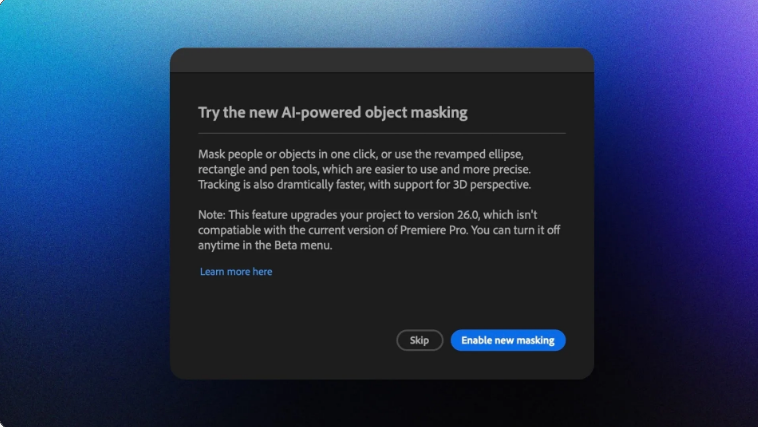
2.If you missed that pop-up, open any project, go to the beta menu at the top of your screen, and select “New Masking.” Premiere Pro will restart with the feature active.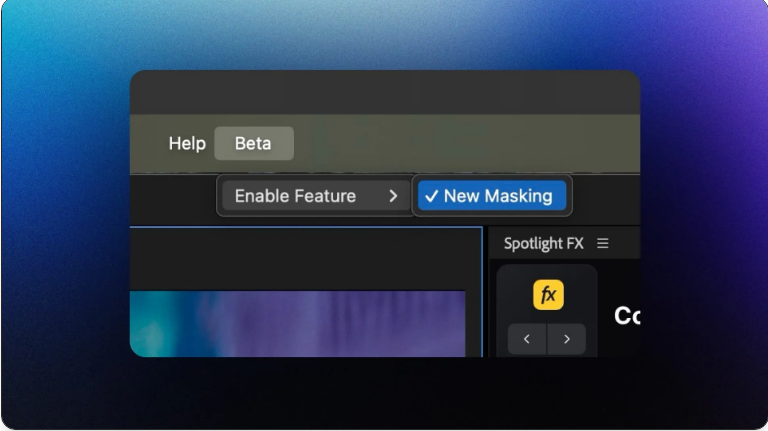
A critical heads-up: Projects with new masking won’t open in regular Premiere Pro 2025 or older versions. Think of it as a one-way upgrade—once you enable it, you can’t go back to older software for that project.
Meet the 4 Masking Tools (Each for a Job)
Premiere Pro’s beta now includes four distinct masking tools, each built for specific scenarios:
●Object Mask Tool: The star of the show. It uses AI to auto-detect people, cars, buildings, and other common subjects—no manual work needed.
●Ellipse Mask Tool: Makes circles or ovals, perfect for classic face masking in color grading. Hold Shift while dragging to lock in a perfect circle.
●Rectangle Mask Tool: Creates four-sided shapes, ideal for masking screens, signs, or architectural details. Hold Shift for a perfect square.
●Pen Mask Tool: Lets you draw free-form shapes with Bezier curves. Use this for complex, irregular objects the other tools can’t handle.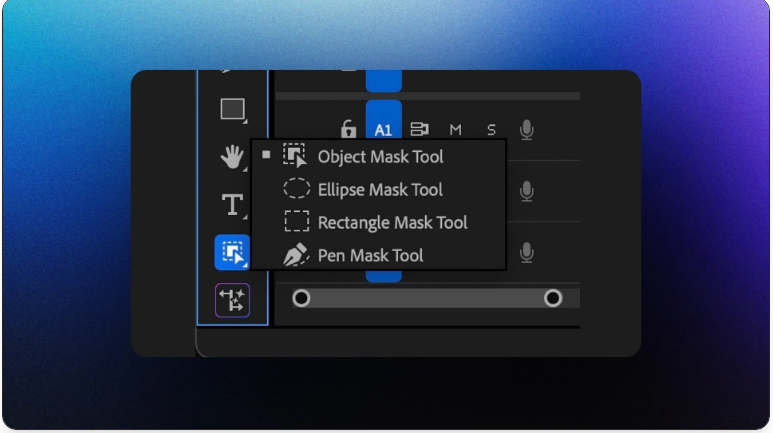
All tools live in your main toolbar. Long-press the mask tool group to see all options and switch between them fast.
Step 1: Create Your First Object Mask
Start by selecting a clip in your timeline. For best results, pick a frame where your subject is fully visible (no obstructions).
1.Grab the Object Mask Tool from your toolbar. As you hover over the Program Monitor, Premiere Pro will highlight objects it can detect—this preview lets you see exactly what the AI picks up before you commit.
2.Click a highlighted object to make an instant mask. The AI maps the entire object’s edge, and the result is often as precise as a manual mask (but way faster).
3.If your target isn’t highlighted automatically, use a backup: Switch to rectangle mode to draw a rough box around it, or use lasso mode for a loose outline. The AI will then detect the object inside that area and refine the mask.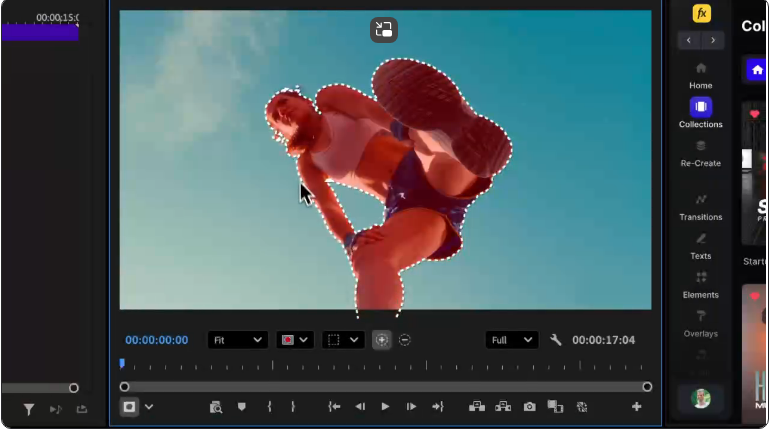
Step 2: Track the Subject Through the Clip
Once your mask is made, it’ll show up in the “Unassigned Masks” section of your Effect Controls panel—that’s where the magic happens. You have four tracking options:
●Bi-directional tracking: Processes the whole clip at once, starting from your current frame and moving forward and backward. Best for most cases.
●Forward tracking: Goes from your current frame to the end of the clip.
●Backward tracking: Moves from your current frame to the start.
●Single frame tracking: Lets you adjust one frame at a time for pinpoint control.
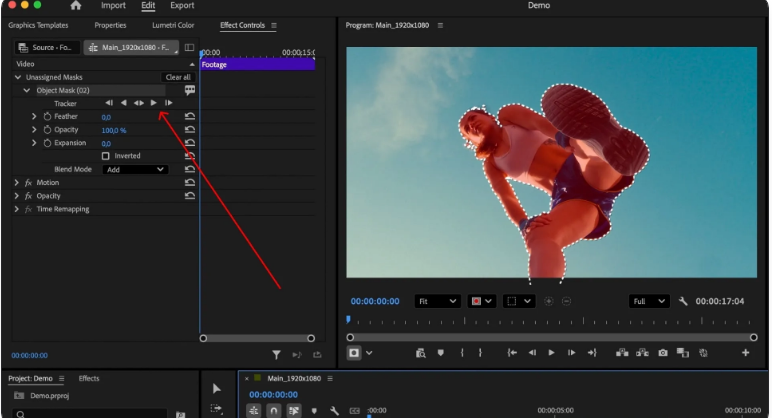
For most projects, bi-directional tracking is your best bet. Click it, and Premiere Pro will follow your subject through camera movement, motion, and even partial遮挡 (occlusions). Speed varies by complexity, but most modern systems handle 6–12 frames per second.
Step 3: Apply Effects to the Masked Area
This is where the workflow gets really smooth—once your subject is tracked, any effect you add automatically uses the mask.
●Blur for privacy: Drag the Gaussian Blur effect from your Effects panel onto the clip. It’ll only apply to the masked area—no manual setup needed.
●Color grading: Add Lumetri Color and tweak skin tones—your changes will only affect the masked person. This selective editing is what makes the tool so powerful for quick fixes.
Don’t Sleep on Redesigned Shape Masks
While object masking gets all the hype, the updated shape masks are worth mastering too. They’re faster and easier to use than before:
●Ellipse masks: Default to bounding box mode (great for face work). Scale, rotate, or reposition quickly—double-click to edit individual points for precision.
●Rectangle masks: Start in point-edit mode (since rectangular objects in video rarely look like perfect squares, thanks to perspective). Adjust corners to match your subject, or double-click for bounding box mode.
●Pen masks: Work like they do in other Adobe apps—click to add points, click and drag for curves, and click your starting point to close the shape.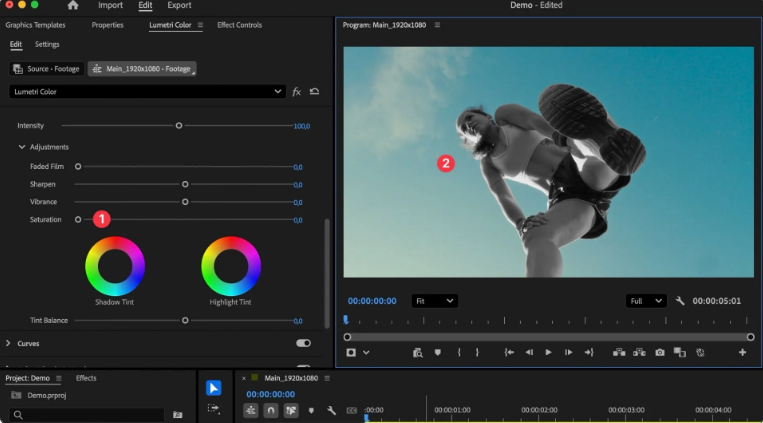
Advanced: Refine Your Mask
Sometimes the AI’s first selection needs tweaks. Use the refinement tools to add or remove areas with precision:
1.Click the plus (+) button to add parts the AI missed.
2.Click the minus (-) button to remove unwanted sections.
3.Hold Option (Mac) or Alt (Windows) to switch between add/subtract modes quickly.
When refining, you can use the same options as initial mask creation: Click highlighted objects to add/remove them, or use rectangle/lasso tools for specific regions.
Combine Multiple Masks (Blend Modes)
You can layer object and shape masks using blend modes to create complex selections:
●Add: Merges all mask areas together.
●Subtract: Removes the current mask from masks above it (e.g., use an object mask for a person, then subtract a rectangle mask to exclude their hands).
●Intersect: Keeps only the areas where masks overlap.
Adjust Tracking Performance
The tracking system lets you tweak parameters to match your footage—more options mean slower processing, so only use what you need:
●Position tracking: Handles basic left/right/up/down movement (most common).
●Scale tracking: Accounts for subjects moving closer to or farther from the camera.
●Rotation tracking: Follows objects that spin or turn.
●Perspective tracking: Handles 3D movement (e.g., someone walking at an angle). It auto-includes position, scale, and rotation.
Manage Mask Data and Projects
Object masks create large data files stored in a folder named “[Project Name] Masks” (next to your project file). This keeps your project file small and fast.
●When sharing projects, include this mask folder—without it, your masks will show as offline and stop working. It’s like sharing media files: You can’t skip it.
●Traditional shape masks don’t create external data, so they’re unaffected.
Essential Keyboard Shortcuts
Here’s a quick reference for the most useful shortcuts (save time by memorizing these):
Action Windows Shortcut Mac Shortcut Notes
Object Mask Tool Ctrl + Alt + O Cmd + Opt + O Launches the tool for new object masks
Change Selection Mode Ctrl + Alt + L Cmd + Opt + L Toggles between rectangle/lasso
Add to Mask ● (plus key) ● (plus key) Or hold Alt while selecting
Subtract from Mask ● (minus key) ● (minus key) Or hold Alt while selecting
Nudge Mask 1px Arrow Keys Arrow Keys Use with mask selected
Nudge Mask 10px Shift + Arrow Keys Shift + Arrow Keys Use with mask selected
Toggle Bounding Box Double-click Double-click Works on mask shapes
Scale Proportionally Shift + Drag Corner Shift + Drag Corner In bounding box mode
Rotate Mask Hover Near Corner Hover Near Corner Look for the rotation cursor
Troubleshoot Common Issues
●Tracking drifts/wrong object: Start masking from a cleaner frame (less background clutter). Use subtract masks to exclude confusing areas.
●Jagged mask edges: Increase the feather value in Effect Controls. Start with 5–10 pixels—higher-res footage needs more feather for natural edges.
●AI won’t detect the object: The tool works best for people, cars, and common items. For unusual or tiny objects, use rectangle/lasso mode to guide the AI.
●Tracking is too slow: Turn off unused tracking options (e.g., if your subject only moves left/right, skip scale/rotation). Track shorter clip sections instead of the whole thing.
Pro Tips for Polished Results
1.Start with the clearest frame: The AI makes better masks when the subject is fully visible and well-lit.
2.Use mask overlays: Check your work with colored overlays (red, green, blue, etc.) or black-and-white (to see the alpha channel). Pick a color that contrasts with your footage.
3.Combine object + ellipse masks for faces: Use object masking for tracking, then add a feathered ellipse mask for smoother edges.
4.Separate masks for multiple subjects: Create individual masks for each person—this lets you tweak tracking/refinement independently.
Performance & System Requirements
●First-time setup: The AI needs to download models when you use the tool for the first time. A loading indicator will show in the Program Monitor—check the Progress panel for status.
●GPU matters: Modern GPUs process tracking much faster than older hardware. Busy scenes (multiple moving objects) will take longer than simple subjects against clean backgrounds.
●Use proxies for speed: If tracking is slow, create lower-res proxy media for masking, then apply the finished masks to your full-res footage.
Integrates with Other Premiere Pro Features
●Works with all effects: Color correction, blur, distortion, and third-party plugins all respect mask boundaries automatically.
●Export to After Effects: Send masked clips to AE for advanced compositing—masks transfer as standard AE masks, and tracking data stays intact.
●Pair with Essential Graphics: Use object masks with motion graphics templates to auto-apply effects to masked subjects (great for repetitive tasks).
What’s Next for the Tool?
Adobe says this is just the start. The current beta focuses on object detection/tracking, but future updates may add:
●Auto mask refinement
●Better edge quality
●Support for more object types
Use the beta’s feedback system to rate mask quality or report issues—this helps Adobe improve the AI for everyone.
Final Note for Pros
The key to professional masking is subtlety. Heavy-handed effects or rough edges give away that you used a mask. Start with gentle adjustments and build up gradually.
For client work, always save unmasked versions of your effects (duplicate the timeline or use adjustment layers that you can disable). This lets you quickly tweak things if the client wants changes.
Object masking in Premiere Pro is a big win for editors who need speed without sacrificing quality. Once you get the hang of it, you’ll reach for these tools daily—they combine AI speed with manual precision, giving you the best of both worlds.
Frequently Asked Questions
How do I access object masking in Premiere Pro?
You’ll need Premiere Pro Beta version 25.6 build 48 or newer. Either click “Enable new masking” when the prompt pops up at startup, or turn it on later via the beta menu at the top of your screen. Note: Projects with this feature won’t open in older Premiere Pro versions.
Does object masking work on all footage?
It works best for people, vehicles, and common objects (the AI is trained on these). For unusual or very small subjects, use rectangle/lasso mode to help the AI identify what to mask.
What happens to mask data when I move a project?
Object mask data is stored in a “[Project Name] Masks” folder next to your project file. You must include this folder when sharing/moving projects—without it, masks will be offline. Shape masks don’t use external data, so they’re fine.
How fast is the tracking?
Speed ranges from 6–12 frames per second. Simple scenes (one subject, clean background) are fastest; busy scenes (multiple moving objects) take longer. Your GPU also affects speed—newer GPUs work better.
Can I edit masks after tracking?
Yes. Use the add (+)/subtract (-) tools to refine masks, or adjust feather/opacity in Effect Controls. You won’t lose tracking data when making edits.