Need to crop a video in Premiere Pro? Whether you’re trimming unwanted edges or reformatting for social media, cropping is a must-know skill—and it’s easier than you might think.
The key is using the Crop effect, which isn’t as obvious as a dedicated “Crop Tool.” But once you know where to find it, the process is straightforward.
Here’s how to do it in three simple steps.

Step 1: Add Your Clip to the Timeline
First, get your footage into Premiere Pro:
1. Create a new project (File > New > Project).
2. Import your video (File > Import, or just drag it into the Project panel).
3. Drag the clip into a sequence on the timeline.
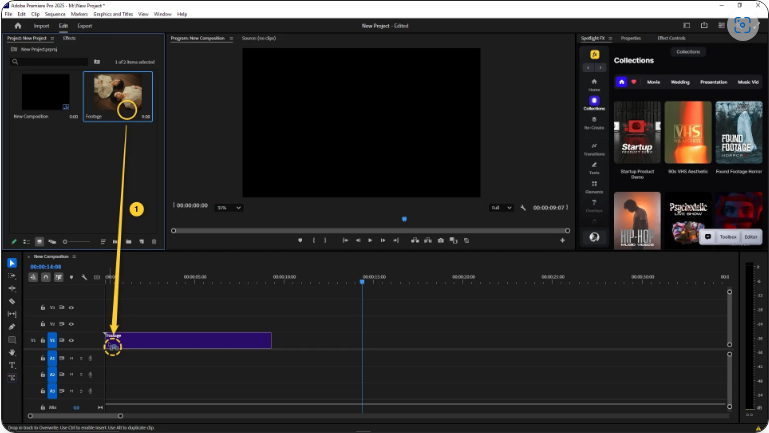
Now you’re ready to crop.
Step 2: Apply the Crop Effect
This is where many users get stuck—there’s no obvious “Crop” button. Instead, you’ll use an effect:
1. Open the Effects panel (usually on the right side).
2. Search for “Crop.”
3. Drag the Crop effect onto your clip in the timeline.
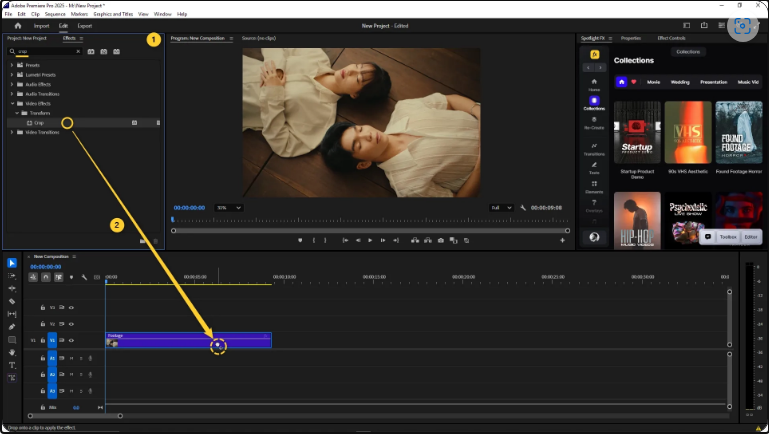
At first, nothing will change—that’s normal. The magic happens in the next step.
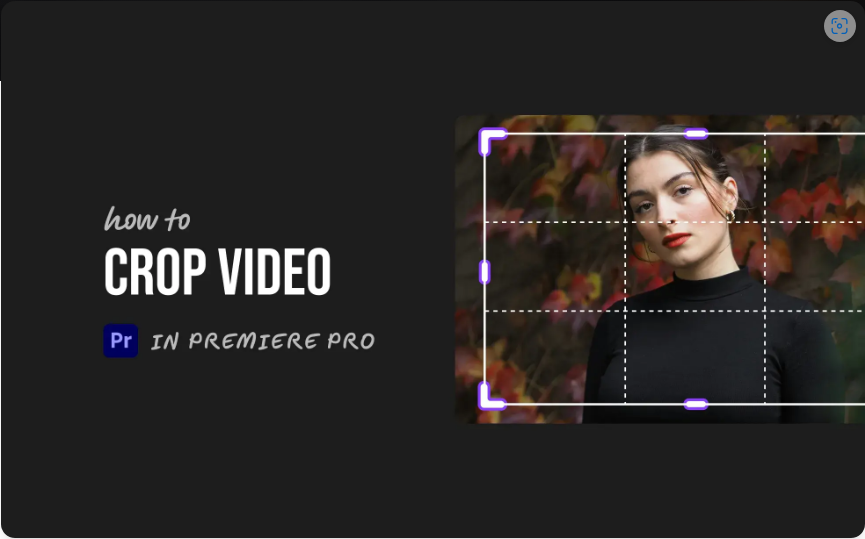
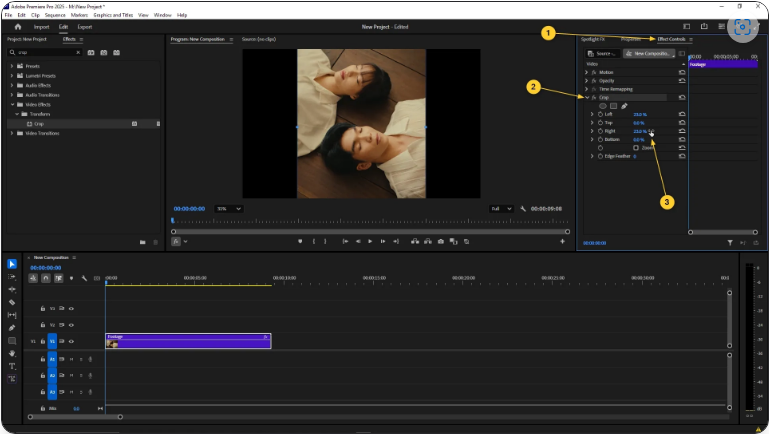
Step 3: Adjust Crop Settings in Effect Controls
Now, go to the Effect Controls panel (top left by default). Under your clip’s effects, you’ll see Crop with four adjustable values: Left, Right, Top, and Bottom.
Here’s how to refine your crop:
● Adjust the percentages to remove unwanted edges.
● Check “Zoom” if you want the remaining image to fill the frame.
● Use keyframes if you want an animated crop (like a slow zoom-in).
And that’s it! Your video is now perfectly cropped.
New in Premiere Pro 2025: A Faster Way to Crop
If you’re using Premiere Pro 2025, Adobe has streamlined the process:
1. Select your clip in the timeline.
2. Find the Crop section in the Properties panel (visible by default).
3. Adjust the Left, Right, Top, and Bottom values directly—no need to search for effects!
This update makes cropping much quicker for everyday edits.
Cropping vs. Changing Aspect Ratio: What’s the Difference?
A common confusion: Cropping and changing aspect ratio are not the same.
● Cropping cuts off parts of your existing frame (like trimming a photo).
● Changing aspect ratio alters the entire frame shape (e.g., from 16:9 to 9:16).
Example:
If you shot a cinematic 2.35:1 video but need it for a 16:9 TV, you have options:
● Add black bars (letterboxing) to preserve the full image.
● Crop the sides to fill the screen.
● Use Auto Reframe (AI-powered) to intelligently reposition the shot.
Best Aspect Ratios for Social Media:
● YouTube (Standard): 16:9 (1920×1080)
● YouTube Shorts/Reels/TikTok: 9:16 (1080×1920)
● Instagram Posts: 1:1 (Square) or 4:5 (Portrait)
● Facebook Posts: 1:1 (Square) often works best
For quick social media adjustments, Auto Reframe is a lifesaver—it automatically keeps the important content in view when resizing.
Final Thoughts
Cropping in Premiere Pro is simple once you know where to look. Whether you’re using the classic method or the faster 2025 workflow, you can now trim and reframe videos like a pro.