Premiere Pro Tips: 3 Options for Separating Boom and Lav Audio Files
Here are a few ways you can properly balance two different audio sources so they sound like one using Adobe Premiere Pro.
Cover image via Shutterstock.
For many productions, working with both a boom mic and a wireless lavalier kit is often the best option for recording audio. It’s a great way to get directional audio on set with the boom, while the lav is a great way to make sure your subject’s voice is clear. It also covers any flaws or imperfections in the boom or lav by giving you options to fill (like too much room noise from the boom, or occasional noises from the lav brushing against clothing).
However, if you’re recording audio in a setup that takes in each source as a separate channel (with, say, a Zoom H4 or a camera like a GH5 — as opposed to recording each to separate external recorders), you’ll find that once you pull your audio into your edit, it will be stereo split between the left and right channels (see below).

You can fix this several different ways, but let’s look at these three simple options. Once you get your channels they way you want them, you can use any other audio editing tips or tricks at your disposal.
1. Import as Mono Channels

The first trick is to tackle the problem from the get-go and change how you import your audio files into Premiere Pro. If you go to the Preferences tab in Premiere Pro CC, you’ll find options for Audio (third down). There, among other options, you’ll see a Default Audio Tracks box, which defaults to “Use File” as it comes in. To separate your stereo audio track into two different tracks, all you need to do is change the options to Mono. Voilà!
2. Use Fill Left and Fill Right Effects

The second trick is to use the the “Fill Left with Right” and “Fill Right with Left” effects in your default Audio Effects tab (see above). To start, you’ll need to duplicate your stereo audio track, then apply the Fill Left effect to one and the Fill Right effect to the other. This will give you two separate audio tracks — the left and right will both be the same. Be careful, though, as you’ll have to do this with every file every time, and they will not automatically stay connected, so you’ll have to manually move them around in your edit as needed.
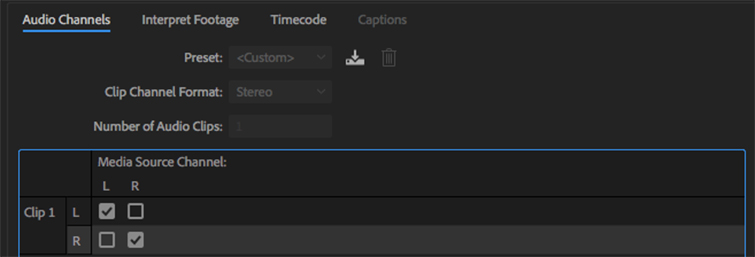
3. Reverse Audio Channels

The third trick, similar to the one above, is to (again) duplicate your audio track, then go into the audio channel properties of each one and manually change the “Media Source Channels” so they’re the same for both left and right (see above). Again, this is a quick solution, but it still requires you to work with two audio tracks for most of your edit.