Glitch effects remain a staple in digital content creation, adding a dynamic, eye-catching element to videos. Whether used in transitions, titles, or overlays, these effects can enhance visual storytelling with a futuristic or distorted aesthetic. The best part? In After Effects, you can layer multiple techniques to craft unique glitch styles.
Part 1: Creating the Base Distortion Effect
Image distortion is the foundation of any glitch effect. Follow these steps to build a customizable distortion layer:
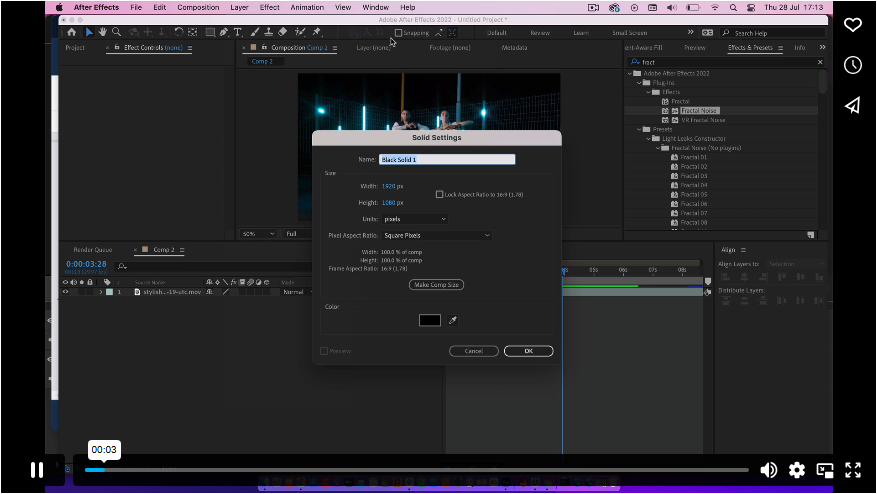
1. Create a Black Solid Layer
● Go to Layer > New > Solid, name it Distortion, and set the color to black.
2. Apply Fractal Noise
● Search for Fractal Noise in the Effects panel and apply it to the layer.
● In the Effect Controls panel, set the Noise Type to Block.
● Adjust Contrast to 200 and Brightness to -100.
3. Customize the Noise Scale
● Disable Uniform Scale, then set Width to 800 and tweak Height as needed.
4. Animate the Effect
● Hold Alt and click the Evolution stopwatch.
● In the expression field, type: time * 100.
5. Set Up Displacement
● Pre-compose the distortion layer (Ctrl/Cmd + Shift + C) and check Move All Attributes.
● Hide the distortion comp by toggling its eye icon.
● Add an Adjustment Layer above your footage.
● Apply Displacement Map, set the layer to your distortion comp, and enable Wrap Pixels Around.
Part 2: RGB Split for a Colorful Glitch
The RGB split effect mimics chromatic aberration, a hallmark of glitch aesthetics.
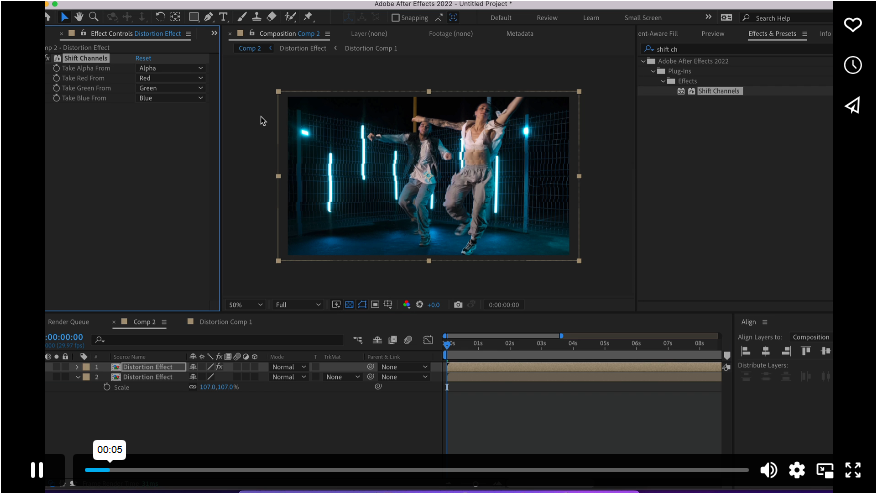
1. Duplicate Your Distortion Comp
● Press Ctrl/Cmd + D to create three copies.
2. Isolate Color Channels
● On the first duplicate, apply Shift Channels and turn off Blue and Green (leaving only red).
● On the second, disable Red and Blue (keeping green).
● On the third, disable Red and Green (keeping blue).
3. Blend Layers for the Glitch Effect
● Set the top two layers’ blending mode to Screen.
● Add a wiggle expression (wiggle(2,20)) to the Position property of each color layer.
● Adjust Opacity keyframes to fade the effect in and out.
Part 3: Optics Compensation for Warped Transitions
This technique adds a warped, blurred effect ideal for transitions.
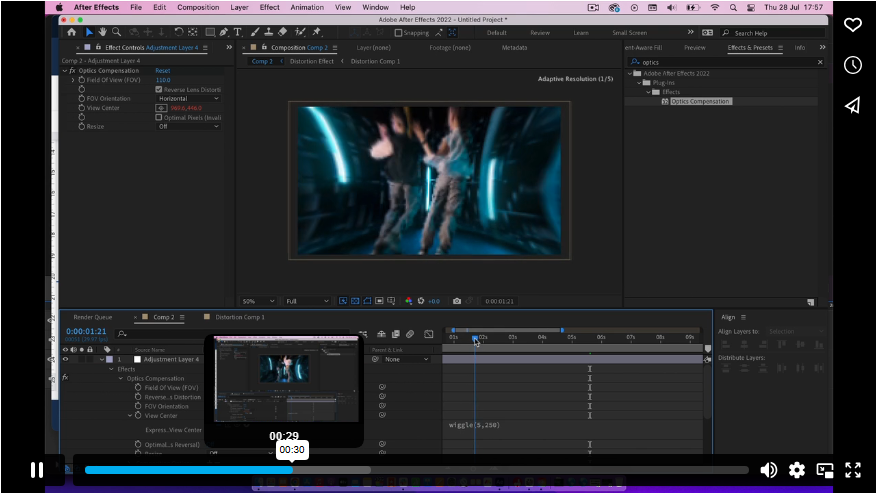 1. Add an Adjustment Layer
● Place it above your footage.
2. Apply Optics Compensation
● Set Field of View to 120 and enable Reverse Lens Distortion.
● Add a wiggle expression (wiggle(5,250)) to the View Center.
3. Enhance with Radial Blur
● Apply Radial Blur, set Type to Zoom, and adjust the Amount.
● Keyframe Opacity to control the intensity (start at 0, peak mid-transition, then return to 0).
Part 4: Glitching Text Elements
Titles can glitch too! Here’s how:
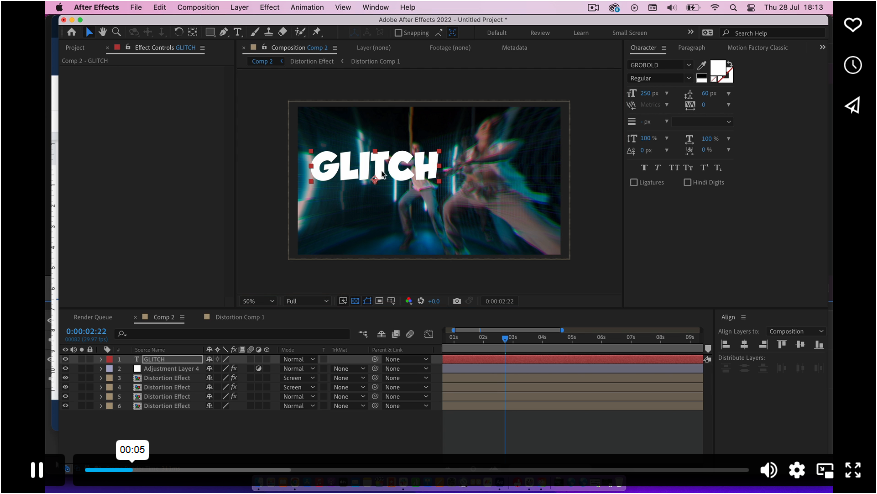
1. Create Your Text Layer
● Use the Type Tool (T) and style it in the Character Panel.
2. Animate Opacity & Position
● Under Text > Animate, add Opacity.
● Apply a wiggle expression (wiggle(5,5000)) to opacity.
● Add another wiggle (wiggle(-100,100)) to Range Selector Offset.
3. Integrate with Distortion
● Place the text below your Optics Compensation Adjustment Layer for a cohesive look.
Final Thoughts
These four techniques—distortion, RGB split, optics warping, and text glitches—provide endless creative possibilities. Whether for music videos, social media, or corporate projects, mastering these effects will elevate your After Effects workflow. Experiment with different settings to develop your signature glitch style!