If you’ve ever stared at After Effects trying to cut or trim a clip—only to scratch your head because it doesn’t work like Premiere Pro or other timeline editors—you’re in good company. After Effects skips the familiar razor tool, has no obvious “chop” button, and its timeline doesn’t use traditional tracks. It can feel confusing at first.
But once you grasp how layers and compositions work? It all clicks. You’ll be able to cut, trim, split, and isolate exactly what you need—no broken timelines, no lost sync, just smooth edits.
Below is a beginner-friendly, step-by-step guide to cutting clips in After Effects—written like a friend walking you through it. We’ll cover every technique, shortcut, and common pitfall along the way.
Step 1: First, learn how layers and the timeline actually work
Before you make a single cut, let’s clear up a key difference: After Effects doesn’t use traditional video tracks. Instead, everything lives in layers inside a composition—think more like Photoshop’s layer system than Premiere Pro’s track-based setup.
Every video or image you drag into the timeline becomes its own layer. These layers can overlap in time (so one plays over another) or stack visually (so one sits on top of another).
That means when you “cut” in After Effects, you’re not slicing through multiple tracks at once. You’re trimming or splitting individual layers—a small shift, but one that changes how you edit.
Step 2: Use the split shortcut to cut a layer at the playhead
This is the most direct way to “cut” a clip in After Effects—it splits a single layer into two separate pieces. Here’s how:
1.Click the layer you want to cut to select it (make sure it’s highlighted in the timeline).
2.Move the time indicator (the small, movable playhead) to the exact spot where you want the cut to happen.
3.Press the shortcut: Mac: Shift + D
a.Windows: Ctrl + Shift + D
Your clip will now split into two layers: one that ends at the playhead, and another that starts right after it. You can delete, move, or adjust each piece independently—no effect on other layers.
Note: This is “splitting” a clip, not “trimming” (we’ll cover trimming next).
Step 3: Trim clips with in and out points
Sometimes you don’t need to split a clip—you just want it to start later or end earlier. That’s where trimming comes in: it lets you “hide” parts of a layer without splitting it. Here’s how to do it quickly:
1.Move the playhead to where you want the clip to start.
2.Set a new in point (the clip’s starting point): Mac: Press [ (left bracket key)
a.Windows: Press Alt + [
3.Move the playhead to where you want the clip to end.
4.Set a new out point (the clip’s ending point): Mac: Press ] (right bracket key)
a.Windows: Press Alt + ]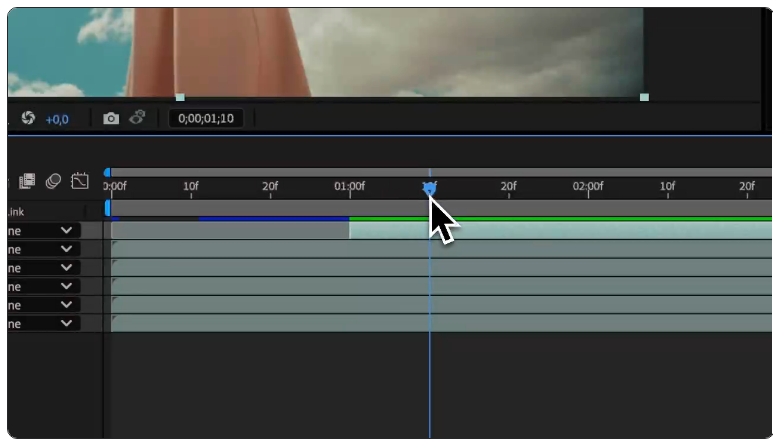
After Effects will now only play the portion of the layer between your in and out points—even though the full file is still saved (so you can undo the trim later if you want).
You can also trim by dragging the edges of a layer in the timeline, but shortcuts are way faster once you get used to them.
Pro tip for Premiere users: If you miss using single keys (like C for the razor tool) to edit, you can customize After Effects’ shortcuts! Go to Edit > Keyboard Shortcuts and remap trim/split commands to match your Premiere workflow—no more retraining your muscle memory.
Step 4: Pre-compose to cut inside a nested composition
What if you have a complex animation (say, text + shapes + effects) and want to trim part of it without messing up your main timeline? That’s where pre-composing (or “nesting”) comes in. It groups layers into a single “mini-composition” you can edit separately. Here’s how:
1.Select all the layers you want to group (click and drag, or hold Shift to select multiple).
2.Create a pre-comp: Right-click the selected layers and choose Pre-compose, or
a.Use the shortcut: Windows (Ctrl + Shift + C) / Mac (Shift + C).
3.Open the new pre-comp (it will show up in your Project panel). Inside it, you can trim, split, or edit layers as much as you want—no effect on your main composition.
4.Go back to your main timeline: the pre-comp now acts like a single layer. You can move it, trim it, or add effects to it without opening the nested comp.
Pre-comps are a game-changer because they’re non-destructive (you can always edit the layers inside later) and keep your main timeline clean. Here’s why they’re useful:
●Isolate cuts or effects so you don’t break other parts of your project.
●Reuse the same pre-comp in other compositions (great for consistent elements like logos).
●Keep complex setups organized (no more scrolling through 20 layers to find what you need).
Step 5: Cutting and trimming audio layers
Good news: Cutting audio works exactly like cutting video—same shortcuts, same process.
●To split an audio layer: Use Shift + D (Mac) / Ctrl + Shift + D (Windows) at the playhead.
●To trim audio (set in/out points): Use [/Alt + [ (start) and ]/Alt + ] (end).
One common gotcha: You won’t hear audio if you just scrub the timeline (drag the playhead back and forth). To preview audio, press 0 on your numpad—that triggers a RAM preview with sound.
Step 6: When to use Premiere Pro instead (yes, really)
After Effects is powerful, but it’s not the best tool for every job. If you’re editing a full video with tons of clips—like a vlog with scene changes, interview cuts, or audio syncing—do your base edit in Premiere Pro first.
Save After Effects for what it’s best at: motion graphics (like animated text), compositing (layering visuals), or sprucing up specific shots (like adding effects). Then, bring your AE work back into Premiere using:
●Dynamic Link: Edits you make in AE update automatically in Premiere (no re-exporting!).
●Rendered clips: Export your AE composition as a video file and drag it into Premiere.
Frequently Asked Questions (FAQs)
Q: How do I cut a part of a clip in Adobe After Effects?
Move the playhead to where you want the cut, select the layer, then press Shift + D (Mac) or Ctrl + Shift + D (Windows). This splits the layer into two separate pieces you can edit independently.
Q: What’s the shortcut to split a clip in After Effects?
●Mac: Shift + D
●Windows: Ctrl + Shift + D
Just make sure a layer is selected—if no layer is highlighted, the shortcut won’t work.
Q: Why can’t I cut clips in After Effects?
The most common issues are:
1.No layer is selected (click the layer in the timeline first).
2.You’re in the wrong panel (e.g., the Project panel instead of the Timeline panel).
3.Your shortcut is overridden (check Edit > Keyboard Shortcuts to fix it).
Q: How do I “cut out” part of a clip in After Effects?
It depends on what you mean:
●Cut time: Split the layer at the playhead with Shift + D (Mac) / Ctrl + Shift + D (Windows).
●Trim the visible part: Use [/Alt + [ (start) and ]/Alt + ] (end) to hide parts of the layer without splitting it.
●Cut out a visual part (e.g., remove a person from a frame): Use a mask (with the Rectangle Tool or Pen Tool) to isolate the area you want to keep.
Q: Can I use the razor tool like in Premiere Pro?
After Effects doesn’t have a dedicated razor tool—but you can replicate it! Use the split shortcut (Shift + D/Ctrl + Shift + D) to cut layers. If you want it to feel like Premiere, go to Edit > Keyboard Shortcuts and remap the split command to C (the old Premiere razor tool key).
Q: How do I trim multiple clips at once?
Select all the layers you want to trim (hold Shift and click each one), then use the trim shortcuts: [/Alt + [ (set in points) or ]/Alt + ] (set out points). All selected layers will trim to the playhead.
Q: What if I want to undo a cut or trim?
Just press Cmd + Z (Mac) or Ctrl + Z (Windows). After Effects treats every split or trim as an undoable action—same as any other edit.