How to Fix Choppy Playback in Premiere Pro 2025: A Complete Guide
There’s nothing more frustrating than firing up Premiere Pro, ready to dive into your project, only to be met with choppy, laggy playback. It kills your creative momentum and makes editing feel like a chore. The good news? You’re not stuck with it. There are several practical steps you can take to smooth things out. Some are quick tweaks; others may require a bit more setup. But once you get the hang of them, you’ll be editing seamlessly in no time.
Let’s walk through the best ways to fix choppy playback in Premiere Pro.
1. Lower the Playback Resolution
This is one of the easiest and most effective fixes. By lowering the resolution in the Program Monitor, you reduce the strain on your system—without affecting your final export quality.
Simply click the dropdown menu under your Program Monitor (usually set to “Full”) and switch it to “½” or “¼.” You’ll notice an immediate improvement in playback smoothness. You might lose some sharpness on screen, but for editing purposes, it’s more than enough.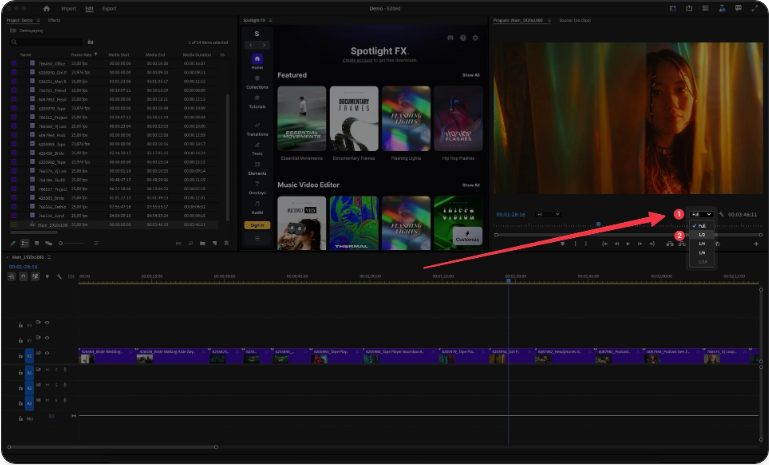
2. Turn Off High-Quality Playback
Found in the wrench icon menu of the Program Monitor, the “High-Quality Playback” option can be a hidden resource hog. Disabling it lightens the load on your CPU and GPU, resulting in smoother performance. Turn this off while editing—you can always re-enable it for final previews.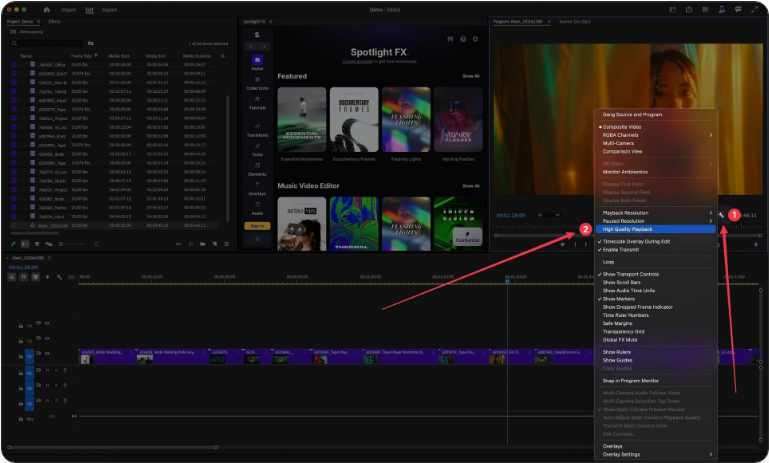
3. Enable GPU Acceleration
If your computer has a dedicated graphics card, make sure Premiere Pro is using it. GPU acceleration lets your video card handle much of the rendering work, freeing up your computer’s main processor.
Go to File > Project Settings > General and set the Renderer to “Mercury Playback Engine GPU Acceleration.” If it’s already on, try updating your graphics drivers.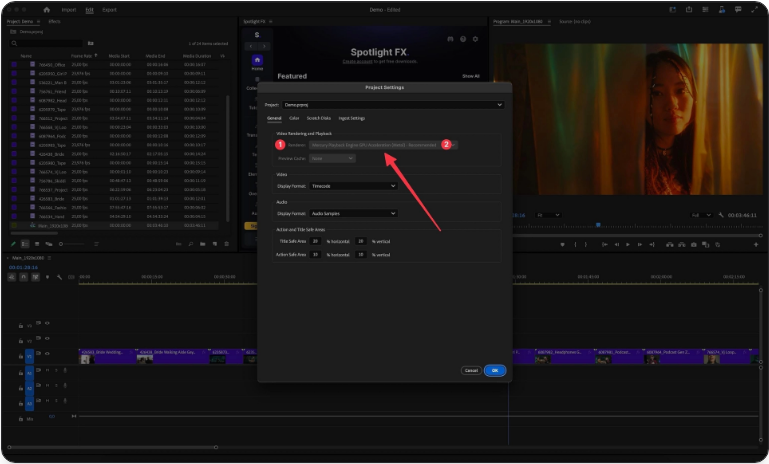
4. Clear Media Cache Files
Over time, media cache files can become corrupted or overly abundant, leading to playback issues. Clearing them regularly can help restore performance.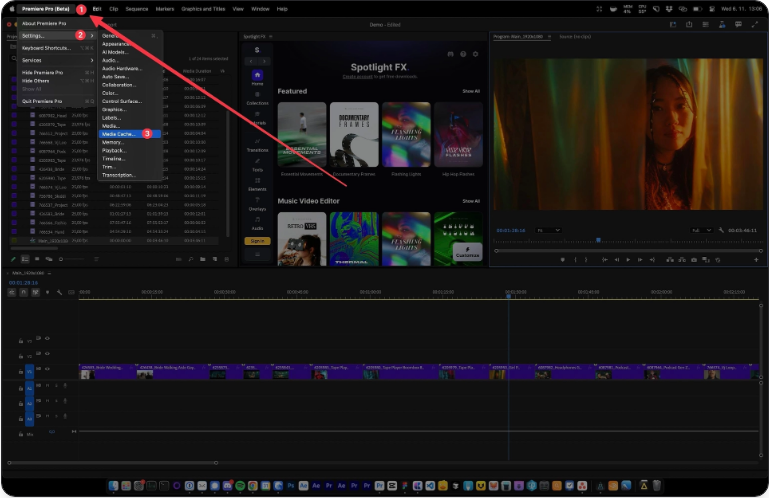
Navigate to Edit > Preferences > Media Cache (on Mac: Premiere Pro > Preferences > Media Cache), click “Delete” under “Remove Media Cache Files.” Don’t worry—this won’t affect your original media.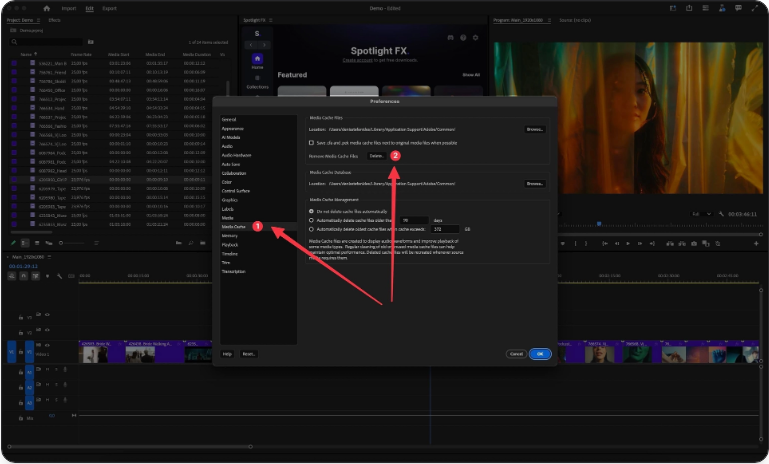
5. Use Proxy Workflows
Working with high-res footage like 4K or 8K? Proxies are your best friend. These are lightweight copies of your clips that make editing fluid. When you export, Premiere automatically uses the full-quality originals.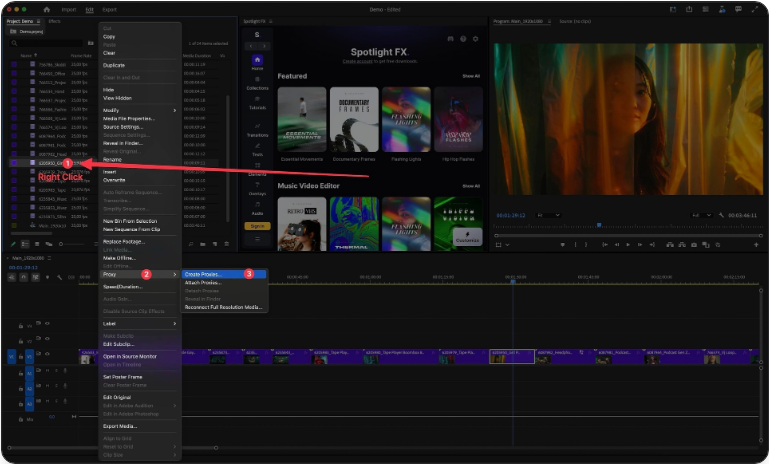
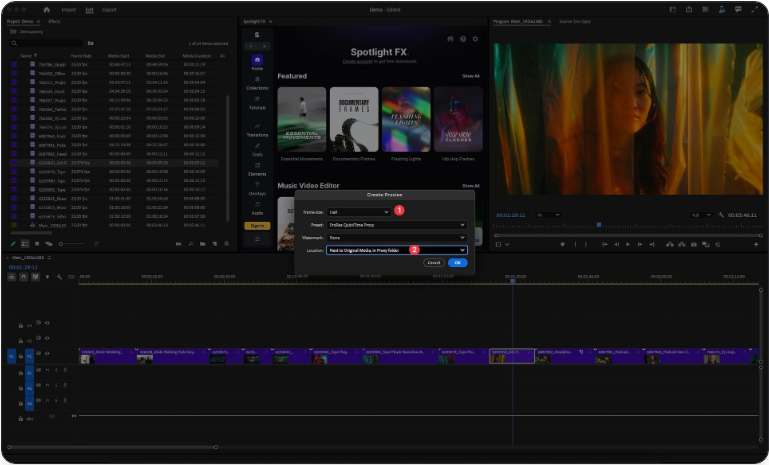
Right-click your clips in the Project Panel, select Proxy > Create Proxies, choose a preset (e.g., ProRes Proxy), and let Adobe Media Encoder generate them. A proxy badge will appear on your clips when attached.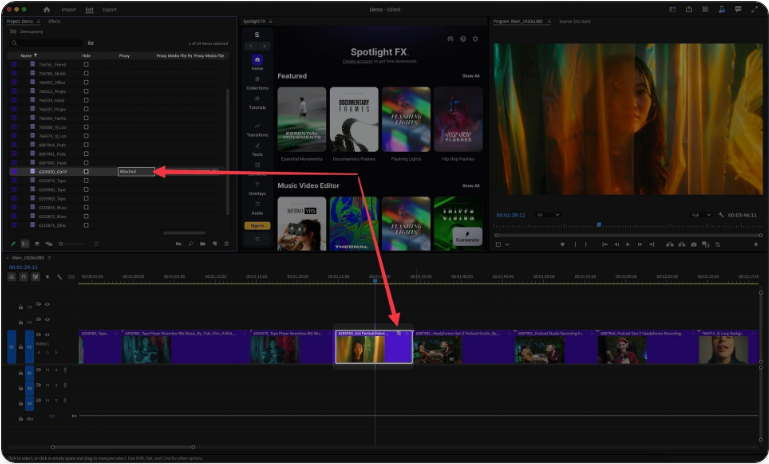
6. Disable Motion Graphics Templates (.mogrt)
MOGRT files are great for stylish titles and graphics, but they can seriously slow down your timeline. Try turning them off while editing—you can always enable them later before export.
7. Check Your Hardware
Sometimes software tweaks aren’t enough. Premiere Pro is demanding—especially with high-resolution media. Newer systems like Apple’s M3-based machines are well-optimized, but older or underpowered hardware may struggle.
If you’re on a Windows PC, ensure you have a capable GPU (like NVIDIA or AMD), sufficient RAM (16GB minimum, 32GB+ recommended), and a fast SSD. Websites like Puget Systems offer detailed hardware guides tailored for creative software.
8. Close Background Applications
Other apps—especially web browsers with multiple tabs—can eat up RAM and CPU resources. Close everything you don’t need while editing to give Premiere Pro more breathing room.
9. Use Fast Storage
Editing directly from a slow hard drive or outdated external drive can cause bottlenecks. For best performance, store your active project and media on an internal NVMe SSD or a fast external SSD. Avoid mechanical hard drives for current projects.
10. Reduce Effects During Editing
Heavy effects and transitions can bring even powerful systems to their knees. Consider disabling effects in the Effects Control panel while you rough-cut your timeline. Re-enable them when you’re ready to fine-tune.
11. Keep Premiere Pro Updated
Adobe regularly releases updates that optimize performance and fix bugs. For example, recent versions added better support for MKV and H.264 files—common formats for game and screen recordings.
Open the Creative Cloud app to make sure you’re running the latest version of Premiere Pro.
Frequently Asked Questions
How can I make Premiere Pro run faster?
Lower playback resolution, enable GPU acceleration, use proxies, clear media cache, and store files on an SSD.
Why is my playback so choppy?
Common causes include high-resolution footage, heavy effects, insufficient hardware, or outdated software.
How do I render for smooth playback?
Press Enter or go to Sequence > Render In to Out to pre-render effects and transitions.
Why is my video glitching or jittery?
Could be due to corrupted cache, unsupported codecs, or outdated drivers. Clear cache, update Premiere, and try converting footage to an edit-friendly format like ProRes.
How do I reduce lag in Premiere?
Use proxies, lower resolution, disable high-quality playback, and shut background apps.
Final Thoughts
Choppy playback is a common headache, but it’s usually fixable. Start with simpler solutions like lowering resolution or clearing cache, then explore proxies and hardware upgrades if needed. Every system is different, so test what works best for you.
Don’t let technical issues kill your creativity. With these tips, you’ll spend less time waiting and more time creating. Happy editing!