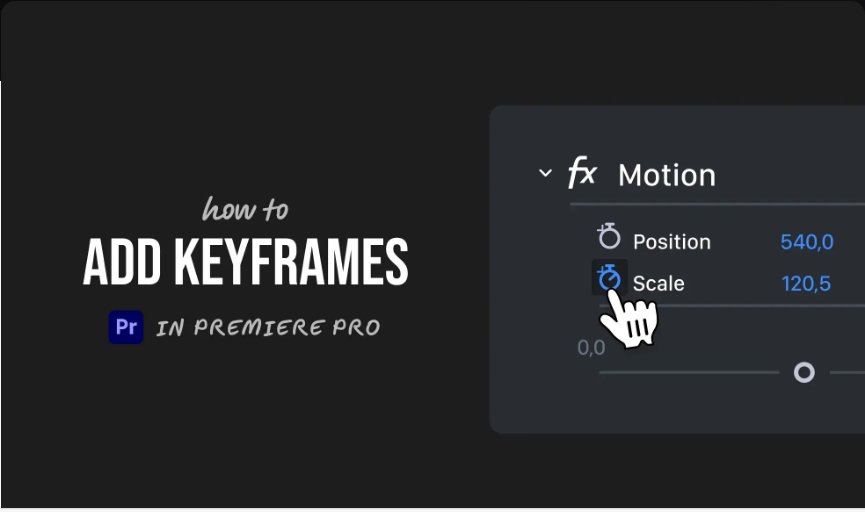
How to Add Keyframes in Adobe Premiere Pro (3 Simple Steps)
Want to bring your Premiere Pro projects to life with animation? Whether you’re working with motion, fading clips, or adjusting audio levels, keyframes are what make it all possible. They mark the points where change begins and ends, letting you create smooth, professional transitions.The best part? Once you learn where to find them and how to use them, adding keyframes is a straightforward process. 
Here’s a beginner-friendly breakdown of how it’s done.
1. Select Your Clip and Open the Effect Controls Panel
●Click on the clip in your timeline that you want to animate.
●Open the Effect Controls panel (usually located in the top-left or top-right workspace).
●Find the property you’d like to animate—this could be Opacity, Position, Scale, Audio Volume, or any applied effect.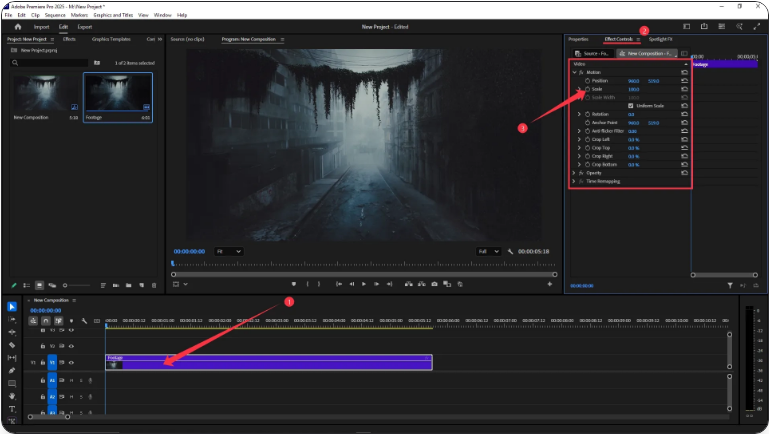
If you don’t see the Effect Controls panel, make sure your clip is selected, or enable it via Window > Effect Controls.
2. Enable Keyframing and Place Your First Keyframe
●Move the playhead to where you want the animation to begin (e.g., the start of the clip).
●Click the stopwatch icon next to the property name. This enables keyframing and places your first keyframe automatically.
●You can adjust the value now or later—for example, leave Opacity at 100% if you’re starting fully visible.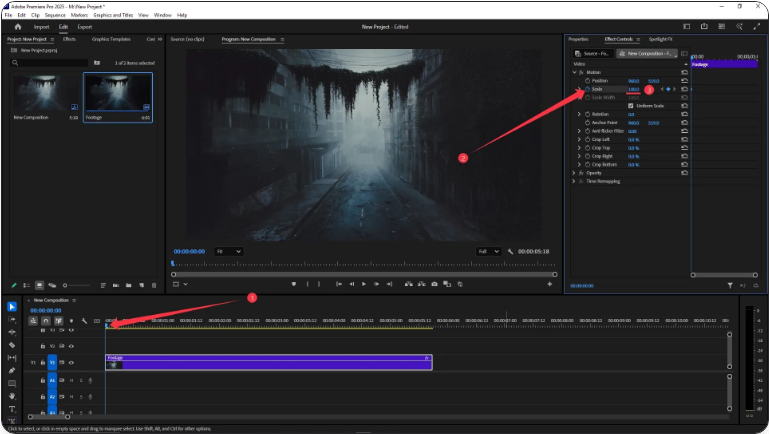
You can also use the diamond-shaped button (Add/Remove Keyframe) to manually add keyframes.
3. Move the Playhead and Set a New Keyframe
●Scrub the playhead to a new point in the timeline where you want the change to end.
●Change the value of the property—for instance, reduce Opacity to 0% for a fade-out.
●Premiere will automatically create a second keyframe at this position.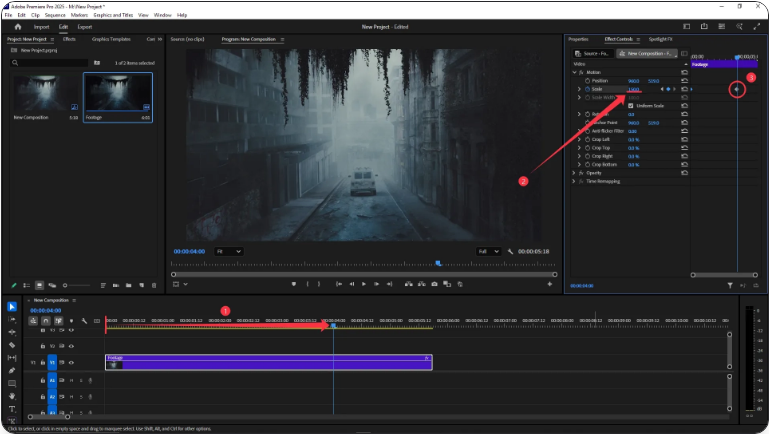
Now your animation is set! Premiere will smoothly transition between the two keyframes. You can fine-tune the timing by dragging keyframes closer or farther apart in the Effect Controls panel.
Final Thoughts
And that’s all it takes! Once you get comfortable placing keyframes, you’ll unlock powerful ways to enhance your videos—from subtle audio fades to dynamic motion effects. Remember: set your start and end points, and let Premiere handle the rest.
Frequently Asked Questions
How do you insert a keyframe?
● To insert a keyframe:Select the clip.
●Open Effect Controls.
●Click the stopwatch icon next to a property.
●Move the playhead and change the value, or click the diamond button to add a keyframe.
How do I add a keyframe directly on the timeline?
For most properties, keyframes are added in the Effect Controls panel. However, you can adjust Opacity and Audio Level keyframes directly on the timeline using rubberbands—just hover over the line and ⌃Ctrl-click (Windows) or ⌘Cmd-click (Mac) to add a keyframe.
Where can I find keyframes in Premiere?
Keyframes appear in the Effect Controls panel for properties like Position, Scale, or effects. For audio and opacity, they also show on the clip itself in the timeline when using rubberband controls.
Is there a dedicated keyframe panel in Premiere?
No, but the Effect Controls panel acts as your keyframing hub. Open it via Window > Effect Controls or press Shift+5. There you’ll see a mini-timeline with all available keyframes for the selected clip.