How to Remove a Background in Adobe Premiere Pro (3 Simple Steps)
Need to remove a solid-colored background from your video? Whether you’ve shot with a green screen or a plain black or white backdrop, Premiere Pro includes a powerful built-in tool that makes the process much simpler than you might expect.
The secret is the Ultra Key effect. It’s made for chroma keying—the technical term for removing a specific color—and once you learn the basics, you can pull off a clean key in just a few clicks.

Here’s a straightforward guide to get it done.
Step 1: Import and Arrange Your Footage
Start by dragging your video clip into your timeline. For the best results, place it on Video Track 2. This leaves Video Track 1 free, so you can easily add a new background layer underneath your subject later on.
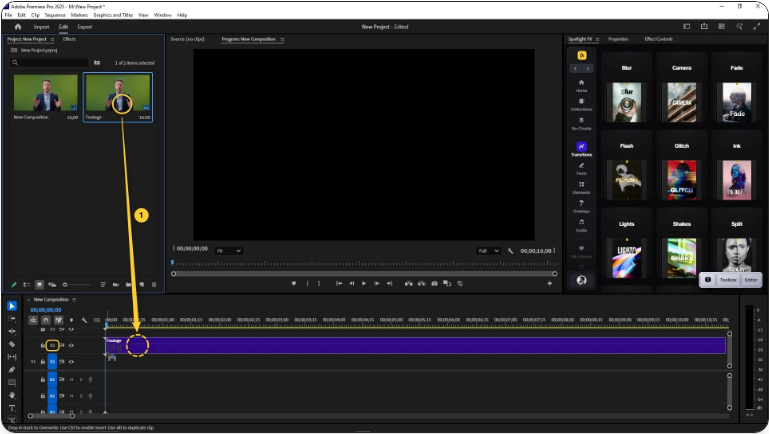
This method works perfectly with any footage that has a uniform background, like a green screen or any other solid color.
Step 2: Apply the Ultra Key Effect
Now, it’s time to apply the keying effect:
1.Open the Effects panel.
2.Use the search bar to find Ultra Key.
3.Drag and drop the effect onto your clip in the timeline.

Once applied, select the clip and open the Effect Controls panel—this is where you’ll do all the fine-tuning.
Step 3: Use the Eyedropper to Key Out the Background
Inside the Effect Controls panel, locate the Ultra Key effect and find the Key Color option.
1.Click the eyedropper icon next to Key Color.
2.Then, click on a solid area of the background color in your video preview monitor.
3.Premiere will instantly remove most of that color. For a cleaner result, refine the key using the settings under Matte Generation, Matte Cleanup, and Spill Suppression.
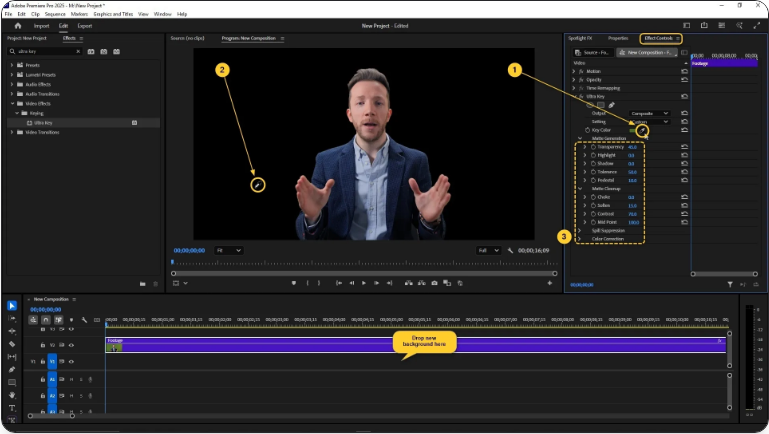
Once you’re happy with how clean your subject looks, simply drag any image or video clip onto the track below to serve as your new background.
And that’s it! After a bit of practice, you’ll be able to remove backgrounds incredibly quickly, all without any extra plugins or external software.
Wrap-Up
Removing a background in Premiere Pro is a simple process once you know which tool to use. The Ultra Key effect handles the complex work; your main job is to carefully select the color and make small adjustments until the edges look perfect.
This technique is a huge time-saver, whether you’re working with professional green screen footage or just isolating a person from a plain wall.
Frequently Asked Questions
How do I make a black background transparent in Premiere Pro?
1. Use the Ultra Key effect:Apply Ultra Key to your clip.
2.In Effect Controls, use the eyedropper tool for “Key Color.”
3.Click on a black area in your video.
4.Adjust the settings under “Matte Generation” and “Matte Cleanup” if needed.
How do I make a video background transparent?
1. To make a solid-color video background transparent:Add the Ultra Key effect to your clip.
2.Use the eyedropper to sample the background color.
3.Tweak the “Matte Cleanup” settings for a sharper edge.
4.Place your new background on the track below.
How do I change the background of a video in Adobe Premiere Pro?
1. After using Ultra Key to remove the original background:Import your new background and place it on a video track below your keyed clip.
2.Adjust its size or position to fit your frame.
3.Use the Ultra Key matte settings to clean up any leftover edges for a seamless look.
How do I fade the background in Premiere Pro?
1. To fade only the background:Duplicate your video clip onto two tracks.
2.Apply Ultra Key to the top clip to remove everything except the subject.
3.Reduce the opacity of the bottom clip (which shows only the background).
4.Use opacity keyframes on the bottom clip to create a gradual fade over time.